
Amid this COVID-19 Pandemic, we have stayed at home (as requested) and have built our dream shop. But, a shop is only four walls and a roof without the equipment that goes inside, so we also been pulling the trigger and have purchased a few items that have been on our wish list.
Finally, the time has come to buy our dream-tools, tools that we’ve been saving for and planning on for the last year or two. Normal projects have stopped in the old garage. Instead, it looks like a warehouse’s will-call area and has boxes and crates of this and that littering the floor.
I won’t get into all the details at this point, but I would like to write about one of the tools that I just couldn’t wait to open.
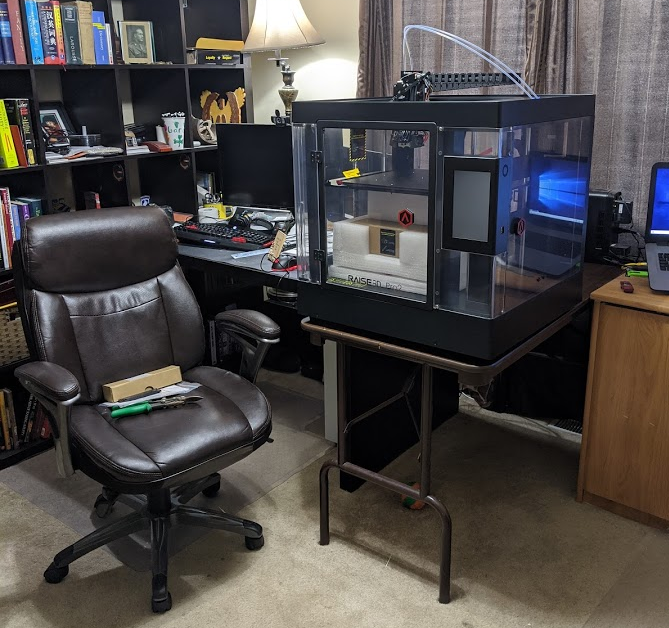
It’s a Raise3D Pro2 printer, and it’s a beast.
RAISE3D Pro2
The Pro2 is an industrial printer used by professionals in many different fields from medical, to educational, to even the movie business.
Check out the industries that employ 3D printers:
- Automotive
- Education
- Electronics
- Engineering
- Entertainment
- Manufacturing
- Medical
- Tool & Die
The printer comes in two different sizes, Pro2 and Pro2 Plus. They are essentially the same tech, except the Plus has double the working space.
The Pro2 boasts a 12 x 12 x 11.8-inch printing envelope and the plus is double that.
Here are the Specs:
- 0.01 mm Layer Height
- Built-in Cameral
- HEPA Air Filter (for those toxic and smelly filaments)
- Compatible with a diverse array of filaments
- 32 Bit Motion Control Board
- 7-inch Touch Screen
- Power Loss and Filament Outage Protection (will resume if either occurs)
- Wireless Compatibility
- Onboard USB port to load files
- Free ideaMaker software
Shipping
Our printer showed up a few days ago on a semi-trailer. Yup, the poor driver had to come down our narrow rural road to drop off the printer. I’m not sure if RAISE3D thought I was a business, but the driver certainly did.
He thought I ran some sort of horticulture enterprise call Garden Power!
Why no one can read my name and read Garon, I’ll never know. The nurse at my doctor’s office consistently calls me Goran and then immediately apologizes for it. I get it there aren’t any other names that sound like mine except for Aaron, Jaron, Darron, Erin, Karin, Baron, etc.;)
Anyway, we were talking about shipping.
The printer came on a small pallet and weighed 150 pounds.
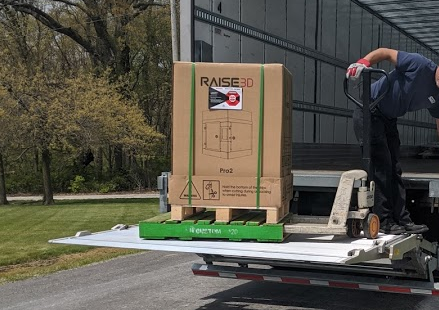
There are a couple of things of note that one should take into account regarding delivery. First, due to the weight, a liftgate is required for residential deliveries. Or any location that doesn’t have a forklift on site.
Second, the pallet, shown above, was too narrow for both forks of the driver’s pallet jack. Luckily, I had the extra green pallet that you can also see in the photo and he was easily able to navigate the package off the truck and to the garage.
Lastly, there is a sensor on the exterior of the box that indicates whether to box was dropped or bumped during transit.
It’s called a ShockWatch, and looks like this:

If the sensor is red, the box had a bumpy journey to your location. Furthermore, it avises that you do the following:
- Do not refuse shipment.
- Make notation on delivery reciept and inspect for damage.
- If damage is discovered, leave item in original container and packaging, and request immediate inspection from carrier within 5 days of delivery date (int’l 3 days).
Disassembly
On top of the box, there is a QR code and web address for unpacking instructions.
Following these instructions is smart and made the process simple. Alternatively, you can access their Support Center online to view the instructions and a video that walks you through the process.
All of the disassembly, equipment setup, and running your first print was well documented in text and video. I only made a couple mistakes, which is par for the course for me. 😉
Size & Placement
I’ll admit that I was not prepared for what a gargantuan beast of a printer this would be. This is in large part due to the enclosure.
Raise3D has done an exemplary job of enclosing this printer. Other printers with the same print envelope seem much smaller to me, and this is due to the ventilation and filtration system as well as the touchpad and camera set up.
All of the professional accessories and industrial components add up to a large footprint. How large?
The Machine Size (W x D x H) is 24.4 x 23.2 x 29.9 in.
To put that into perspective, it’s a little smaller than the size of a residential oven and range.
Placement
We’ve already covered that the printer is heavy, and that means you will want to operate it on a sturdy table or stand.
I have it temporarily staged on a folding table next to my desk and the table is not quite sturdy enough. When those X and Y motors start pushing the dual extruders around, rapidly moving from point to point the printer moves the table around.
As of yet, I haven’t had any noticeable print failures due to the lack of table rigidity, but when I move it out to the shop, I’ll make sure it’s on a stable base. I watched YouTube videos where excessive shaking can lead to ghosting, which is a lumpy or otherwise not-smooth surface.
In those cases, I believe the ghosting is due to the printer’s own lack of rigidity, in my case, it’s the fault of the table. Thus far, the Pro2 printer is as solid as a rock.
Set-Up
There is a fair amount of set-up that is required prior to printing. Again, refer to Raise3D’s support center for instruction.
There are zip ties and axes-clips that need removal as well as boxes of filament and accessories.
The printer came with a box each or red and white premium PLA filament, gloves, tweezers, an extra fuse, and a few other odds and ends including a thumb drive.

During the set-up process, the instructions take you through installing the two spools of filaments. If you are doing this, and are new to the field as I am, remember that anything you do to one extractor, you must also do to the other.
I got lost in following the instructions to the tee and didn’t think to also load the filament in the right extruder. The video instructions only show how to do the left extruder. This small oversight led to the abortion of my first print job, as the white filament never came out. Lol.
It wasn’t a big deal, and after I properly loaded the filament, the little Give-Away Spinner file they sent with the printer came out perfectly.
The second mistake I made was when I installed the heat bed. Again, I simply followed the video instructions and ran into a clearance problem. The bed became wedged between the frame and the left extruder nozzle.
In the video, it slid right in, not the case with mine, until I noticed that I had to travel Z-axis down several millimeters give it extra access.
I highly doubt an experience 3D printer operator would make the mistakes that I did, but that’s okay. I wanted to buy a printer I could grow into, and I admit that I have much to learn.
Printing for the First Time
The printer arrived with a small USB thumb drive. On the drive, you will find the ideaMaker software as well as an STL/3D OBJ file for your first print.
Again, they have an instructional video that shows you how to use ideaMaker. I had a couple of questions and found this video on YouTube that helped me out.
After you have used ideaMaker to slice the object you want to print, you need to send it to the printer. This can be done via a wired/wireless network connection or using a USB thumb drive.
I have tried both approaches and the user interface on the printer’s touch screen is for all intents and purposed identical to that on my computer. There were no issues here.
The object took almost an hour to print and there were no issues. I ran it a second time with different color settings and again, had success.
Here are the results of the print-job.
Editing Software and Online Repositories
To create the models I wish to print for prototyping and experimentation, I am using Fusion 360. They offer a free license to students, hobbyists, and enthusiasts and so far, the software is intuitive and easy to use.
Obviously, the difficulty, as with any new software, is not knowing what you don’t know, but so far so good. Compared to Inventor and Autocad, I prefer Fusion 360. You still get to use keyboard short cuts, the mouse gestures are awesome, and the workflow makes a lot of sense.
Now, as I am learning how to model and slice my own projects (and want to have some fun in the meantime) I’ve been download and printing files from Thingiverse.
Thingiverse is an online repository with 1000’s of objects you can attempt to print. I have soon realized that not all the objects on there are designed equally.
I’ve had a couple fails and as many wins. The process as a whole, however, is one of learning. Failing, it turns out is more of a teacher than having an object print the first time without issue.
The comments associated with each “thing” often go over slice settings.
If you’re looking for an immediate win, simple 2-dimensional objects, like this Punisher Skull, are almost guaranteed to print.

Conclusion
I think that wraps it up. There are many different ways to use a 3D printer, and I’m looking forward to using ours in the future.
I know it will be perfect for prototyping new tools and fixtures, and it’s a great first step into the realms of CNC operation. I’m looking forward to learning more about g-code as well as applying some of the wins with the 3D printer to other machines.
We also have a CNC ShapeOKO router (still in the box) and a CNC Mill (to arrive later this year). Learning first on the Raise3D Pro2 seems like a good place to start.